Integrating With Dropbox
This post comes all the way from Berlin and is by Jan Moehrke from memoniac.com. Jan explains how to add Dropbox’s functionality to FUEL CMS in 5 steps.
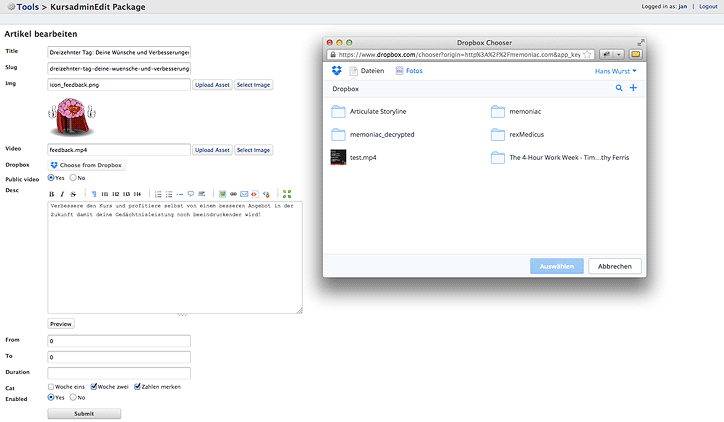
What will you have in the end?
This tutorial will show you how to integrate Dropbox with a simple module in FUEL CMS. Similar to the previous post, Creating a Color Picker Custom Field, you will be creating a custom field type. This custom field will allow users to download files from a Dropbox account to FUEL CMS. This is done between the servers, so unless your server is situated on a Carribean island, this should be rather fast (100mb in less than 5 seconds on our server). Before you get started, make sure you have a simple module created to test out the code. For more information on creating a simple module, check out the Simple Module Tutorial in the user guide.
Step #1: Create a Dropbox app
First, go to www.dropbox.com/developers/dropins/chooser/js, create a new app (make sure to select “Drop-ins app”) and save the app key–we’ll need it in a second. You need to specify a domain where your FUEL CMS installation resides, otherwise Dropbox will not grant access.
Step #2: Create a custom field type function
Create a library file at fuel/application/libraries/MY_custom_fields.php and add the code snippet below. This snippet inserts the Dropbox button with the linkType option set to be “direct” into your module’s form. After clicking the Dropbox button and selecting a file, the direct link is stored in a hidden input field.
<?php
class MY_custom_fields {

    function dropbox($params) {
        $form_builder =& $params['instance'];

        $filename = '';
        // normalize value to not have the #
        if (!empty($params['value']))
        {
            $params['value'] = trim($params['value'], '#');
            $filename = rawurlencode(basename($params['value']));
        }

        // set this in a separate add_js call with a key of "dropbox" (2nd parameter), so that it is cached and only called once
        $form_builder->add_js('<script type="text/javascript" id="dropboxjs" src="https://www.dropbox.com/static/api/2/dropins.js" data-app-key="'.$params['app_key'].'"></script>', 'dropbox');
        $js = '<script type="text/javascript">
                $(function() {
                    var options     = { success: function(files) { $("#'.$params['key'].'").val(files[0].link); },linkType: "direct" };
                    var button      = Dropbox.createChooseButton(options);
                    var $btn         = $("#'.$params['key'].'");
                    $btn.replaceWith(button);
                   $("").attr({ type: "hidden", id: "'.$params["key"].'", name: "'.$params["key"].'"}).insertAfter(".dropbox-dropin-btn");


                })
            </script>';
        $form_builder->add_js($js);
        $params['class'] = (!empty($params['class'])) ? $params['class'].' field_type_dropbox' : 'field_type_dropbox';

        //$params['type'] = 'text';
        return $form_builder->create_text($params).' '.$filename;
    }
}
Step #3: Associate the custom field type with Form_builder
Now, let’s associate this field type with the Form_builder class so that it can be used with your module’s form. To do this, add the following code to the fuel/application/config/custom_fields.php file:
<?php
$fields['dropbox'] = array('class'      => 'MY_custom_fields',
                            'function'  => 'dropbox',
                            'represents' => array('name' => 'dropbox'));
// other field defintions might be here as well
include(FUEL_PATH.'config/custom_fields.php');
Step #4: Add it to your model
Next, add the field to your model’s form_fields method by adding the snippet below. Note that we give the field the “type” value of “dropbox” and we pass the app_key (Replace YOUR_APP_KEY_HERE with your real app key.)
function form_fields($values = array(), $related = array())
{
    $fields = parent::form_fields($values, $related);

    //... other field code

    $fields['dropbox'] = array('type' => 'dropbox' app_key='YOUR_APP_KEY_HERE');
    return $fields;
}
Step #5: Adding it in your views
The last step is to actually implement the data of the field into your view file. To do so, query the model to return a result and use the “dropbox” field on the record. See the snippet below as an example of using the “dropbox” field as an image source:
<?php $record = fuel_model('my_model', array(find='one' where=array('slug')); ?>
<img src="<?=$record->dropbox?>" alt="" />
That’s it!
Extra Credit
For extra credit, let’s setup a way to download the file to your local FUEL CMS assets/images folder and change the stored value to just be the name of the file and not the full Dropbox path. To do this, we can create a module model hook:
function on_before_save($values)
{
    // normalized_save_data is a model property which will include all the $_POST data
    $dbfile = (isset($normalized_save_data['dropbox'])) ? $normalized_save_data['dropbox'] : '';

    if (!empty($dbfile))
    {
        // clean up file name path
        $filename = rawurlencode(basename($dbfile));
        $dbfile = dirname($dbfile).'/'.$filename;

        $filename = rawurlencode(basename($dbfile));
        $dest_file = assets_server_path('images/'.$filename);
        file_put_contents($dest_file, fopen($dbfile, 'r'));
        $values['dropbox'] = $filename;
    }
    return $values;
}
For further questions please write us an email at support@memoniac.com or check out some of our mnemonic video courses on memoniac.com in German though.
Comments have been turned off for this post.